
集成 Apple ID 登录功能
网站接入 Apple ID 登录
本文档介绍如何在网站中集成 Apple ID(Sign In With Apple)登录功能,涵盖 Apple 开发者平台的配置以及后端代码实现。
一、Apple 开发者平台配置
1.1 创建服务 ID
服务 ID(Services ID)是 Apple 识别你网站的标识,用于 OAuth 授权流程。
-
登录 Certificates, Identifiers & Profiles,点击
Identifiers→+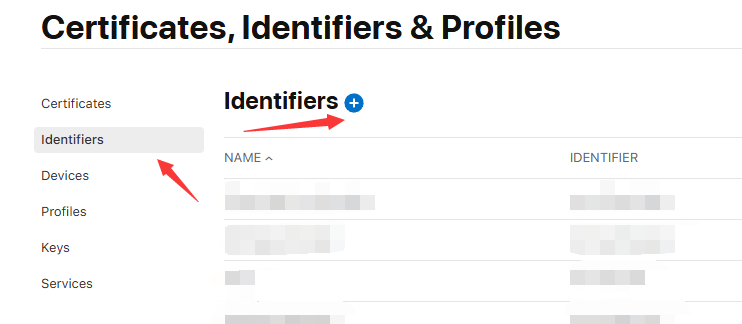
-
选择
Services IDs,点击继续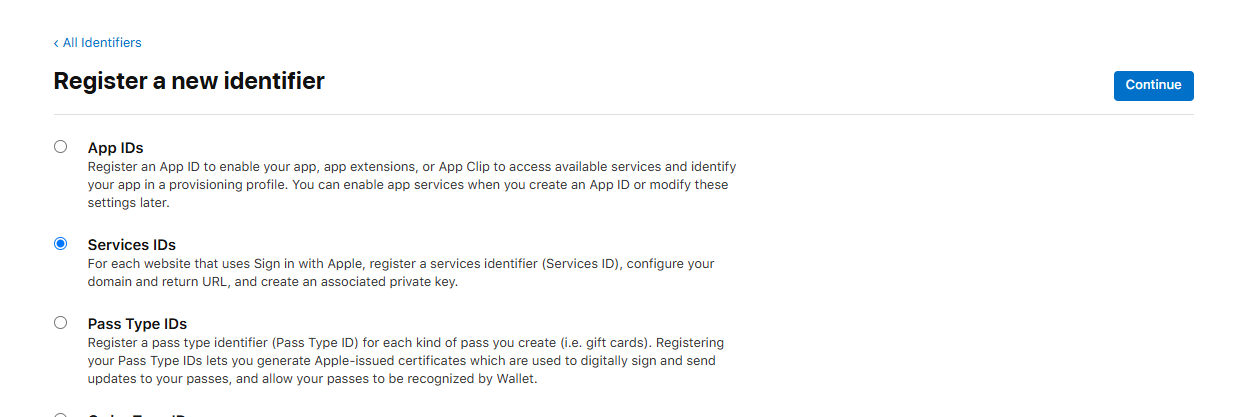
-
填写
Description(描述)和Identifier(格式为.xxxxxx),点击Continue→Register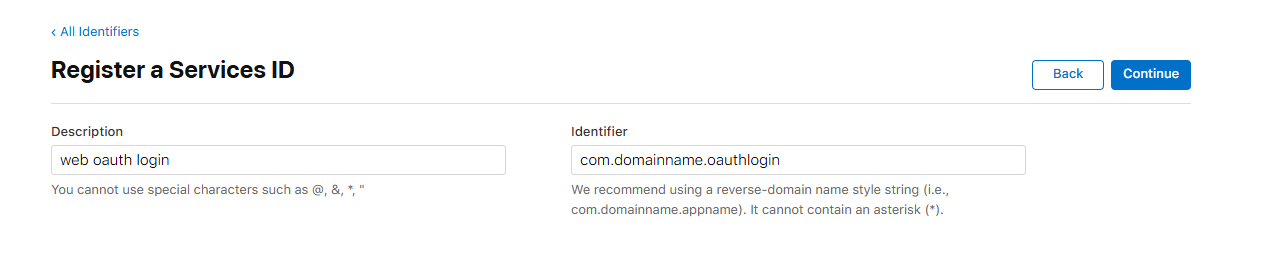
-
返回
Identifiers列表,点击刚创建的服务 ID 进入详情,勾选Sign In With Apple→Configure,配置以下三项:- 主 App ID:关联的 App ID
- 域名:你的网站域名
- 回调地址:OAuth 回调 URL
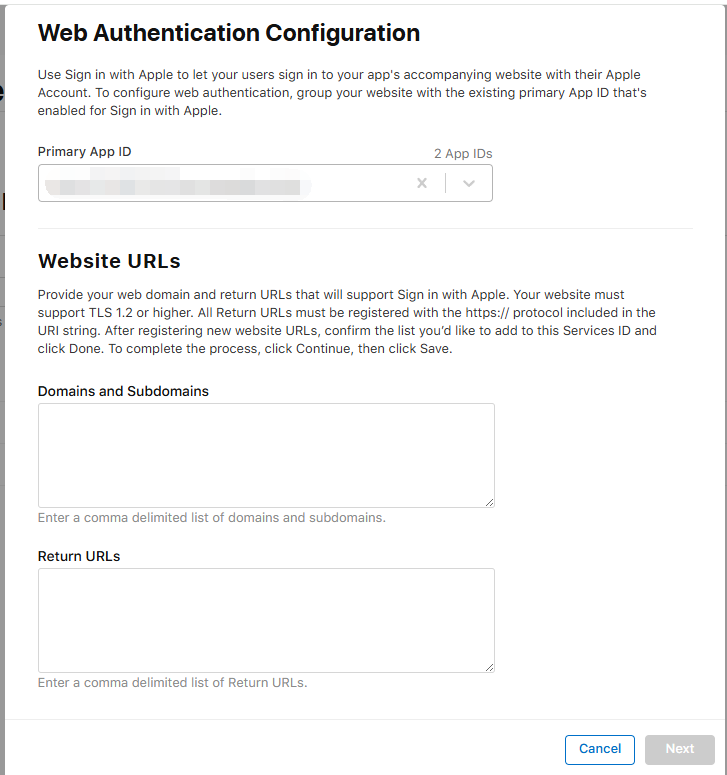
1.2 创建私钥
私钥用于生成 client_secret JWT,是后端与 Apple 通信的凭证。
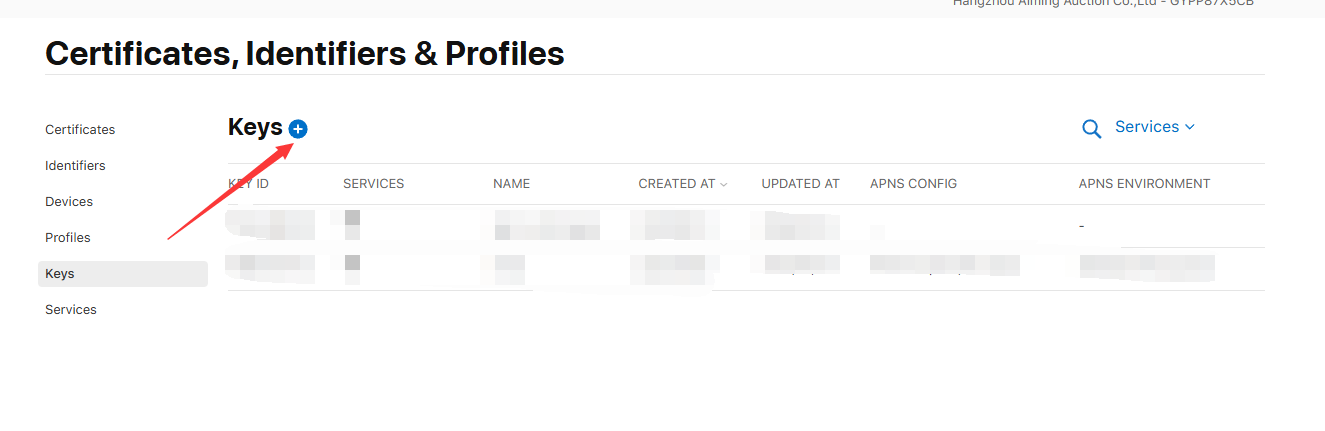
-
进入 Keys,点击
+
-
填写密钥名称和描述,勾选
Sign In With Apple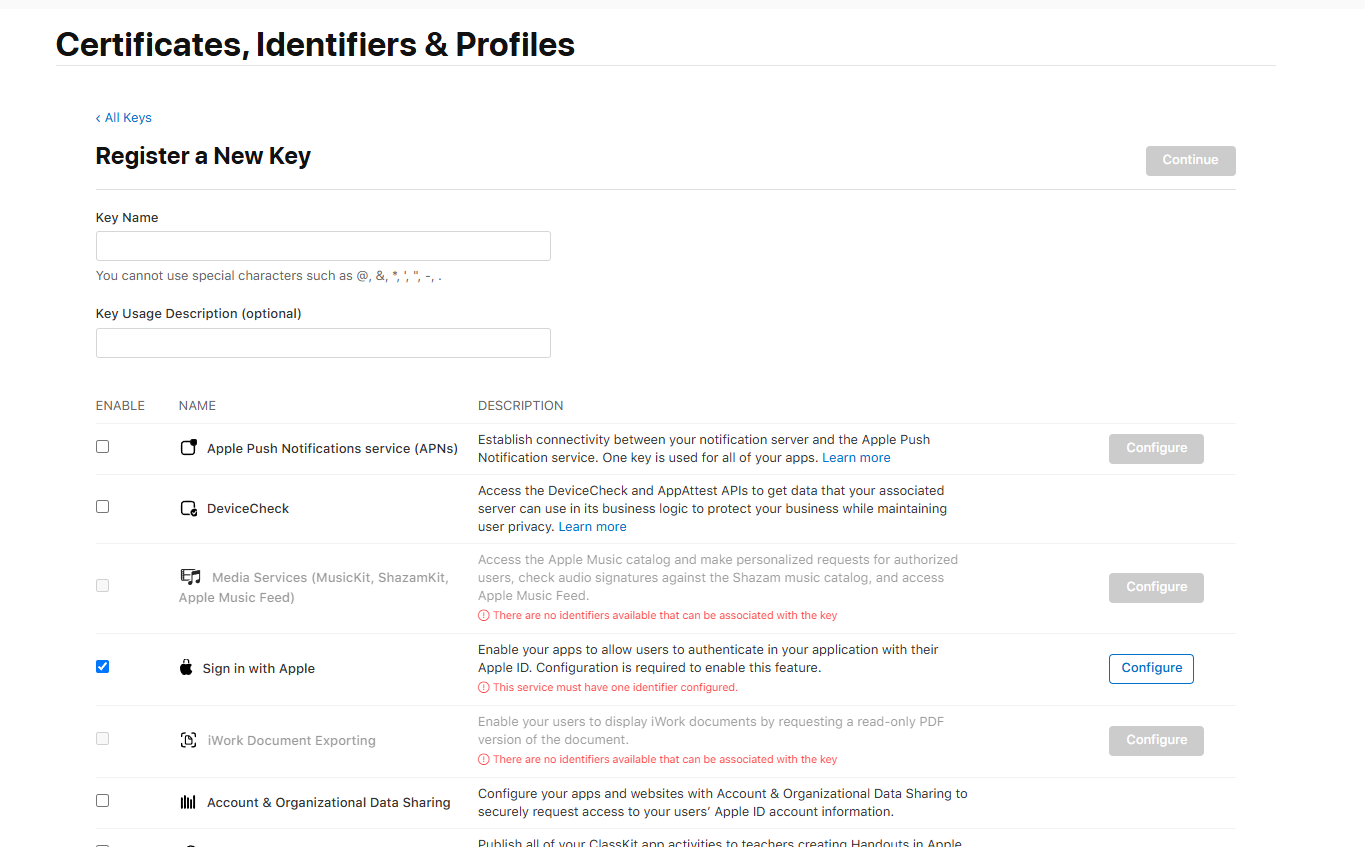
-
点击
Configure,选择主 App ID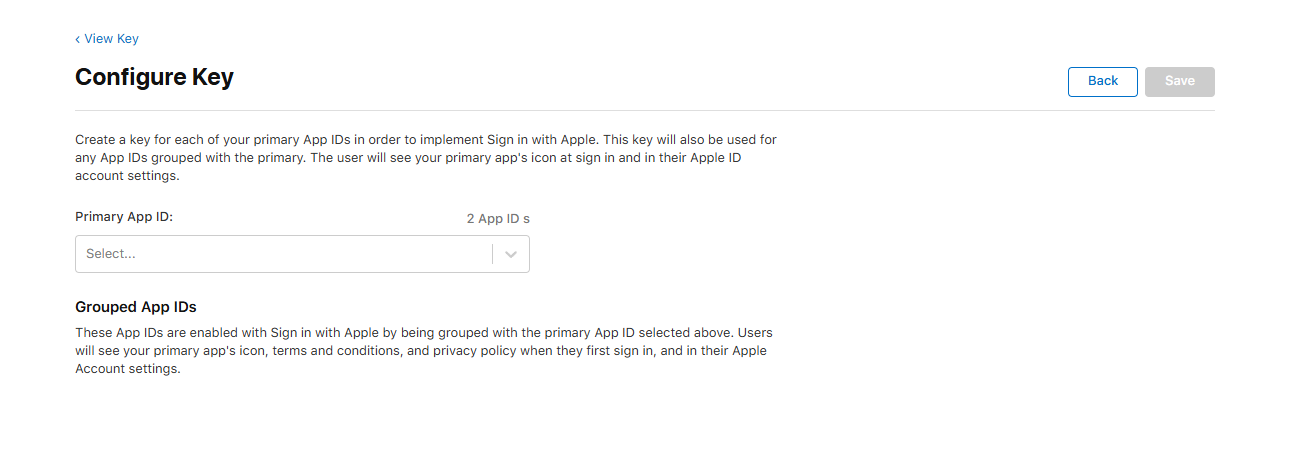
-
点击
Continue→Register完成创建,然后点击Download下载.p8密钥文件(仅可下载一次,请妥善保管)
二、后端集成
2.1 构建授权链接
将用户重定向至 Apple 授权页面,用户完成登录后 Apple 会回调你配置的地址。
var state = Guid.NewGuid().ToString("N"); // 防 CSRF 令牌,回调时原样返回
// 建议将 state 存入 session 或 redis,回调时校验一致性
var url = "https://appleid.apple.com/auth/authorize";
url += $"?client_id={_Options.ClientId}";                                    // 服务 ID(Identifier)
url += $"&nonce={DateTimeOffset.Now.ToUnixTimeMilliseconds()}";              // 随机数,防重放
url += $"&response_type=code";                                               // 授权码模式
url += $"&state={state}";                                                    // 防 CSRF 令牌
url += $"&redirect_uri={HttpUtility.UrlEncode(_Options.RedirectUri)}";       // 回调地址
return url;
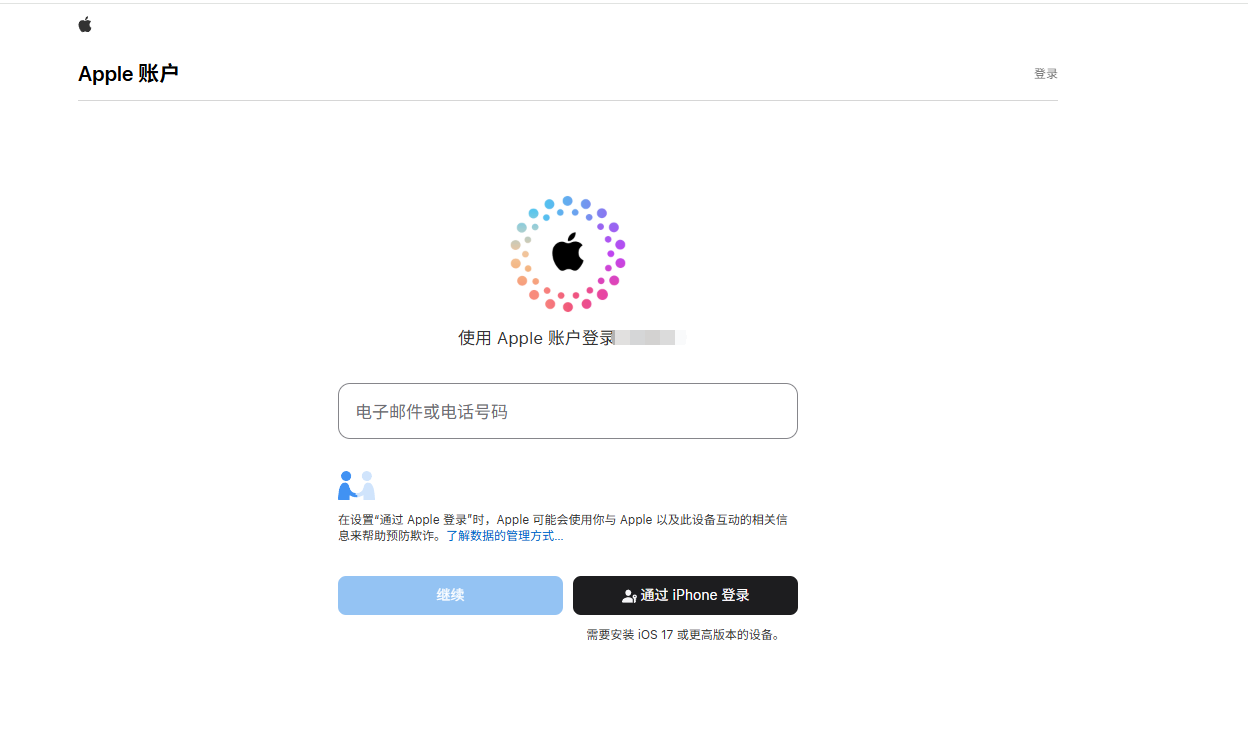
前端可通过链接或按钮跳转至该 URL,用户将看到 Apple ID 登录页面:
2.2 回调处理与令牌交换
用户授权后,Apple 回调你配置的地址并携带 code(授权码)和 state 参数。
安全提醒: 务必校验 state 与发起授权时一致,防止 CSRF 攻击。
使用授权码向 Apple 换取 id_token:
var postData = new Dictionary<string, string>()
{
    ["client_id"] = _Options.ClientId,        // 服务 ID 的 Identifier
    ["client_secret"] = CreateClientSecret(),  // 动态生成的 JWT(见 2.3)
    ["code"] = code,                           // 授权码
    ["grant_type"] = "authorization_code",
    ["redirect_uri"] = _Options.RedirectUri    // 回调地址
};
var content = new FormUrlEncodedContent(postData);
var response = await _HttpClient.PostAsync("https://appleid.apple.com/auth/token", content);
var result = await response.Content.ReadAsStringAsync() ?? "";
if (response?.IsSuccessStatusCode == true && !string.IsNullOrEmpty(result))
{
    var token = JsonConvert.DeserializeObject<dynamic>(result);
    return token?.id_token?.ToString() ?? "";
}
2.3 生成 client_secret
Apple 要求每次请求令牌时都生成新的 client_secret(JWT 格式),签名算法为 ES256。
步骤一:读取 .p8 密钥文件
var key = File.ReadAllText(_Options.KeyFile); // .p8 密钥文件路径
var base64 = Regex.Replace(key, @"-----BEGIN PRIVATE KEY-----|-----END PRIVATE KEY-----|\s", "");
var pkcs8 = Convert.FromBase64String(base64);
var ecdsa = ECDsa.Create();
ecdsa.ImportPkcs8PrivateKey(pkcs8, out _);
return ecdsa;
步骤二:构造并签发 JWT
var kid = _Options.KeyId;
var now = DateTimeOffset.UtcNow;
var expires = now.AddMinutes(5);

var securityKey = new ECDsaSecurityKey(ecdsaKey) { KeyId = kid };
var credentials = new SigningCredentials(securityKey, SecurityAlgorithms.EcdsaSha256);

var claims = new Dictionary<string, object>()
{
    ["iss"] = _Options.TeamId,                  // 团队 ID(注意与 ClientId 区分)
    ["iat"] = now.ToUnixTimeSeconds(),          // 签发时间
    ["exp"] = expires.ToUnixTimeSeconds(),      // 过期时间
    ["aud"] = "https://appleid.apple.com",      // 固定值
    ["sub"] = _Options.ClientId,                // 服务 ID
};

var tokenDescriptor = new SecurityTokenDescriptor()
{
    Claims = claims,
    Expires = expires.UtcDateTime,
    SigningCredentials = credentials,
    AdditionalHeaderClaims = new Dictionary<string, object>()
    {
        ["alg"] = "ES256",
        ["kid"] = kid
    },
    TokenType = "",
    NotBefore = now.AddMinutes(-1).UtcDateTime  // 补偿与 Apple 服务器的时间偏差
};

var tokenHandler = new JwtSecurityTokenHandler();
return tokenHandler.WriteToken(tokenHandler.CreateToken(tokenDescriptor));2.4 验证 id_token
通过 Apple 公钥验证 id_token 的签名和有效期,提取用户唯一标识(sub)和邮箱(email)。
var handler = new JwtSecurityTokenHandler();
var unvalidatedToken = handler.ReadJwtToken(idToken);
var kid = unvalidatedToken.Header.Kid;

var securityKey = GetPublicKey(kid); // 根据 kid 获取对应公钥(见 2.5)
if (securityKey == null) return null;

var validationParameters = new TokenValidationParameters
{
    ValidateIssuer = true,
    ValidIssuer = Issuer,                       // https://appleid.apple.com
    ValidateAudience = true,
    ValidAudience = Audience,                   // 你的服务 ID
    ValidateLifetime = true,
    ClockSkew = TimeSpan.FromMinutes(5),        // 允许 5 分钟时钟偏差
    RequireExpirationTime = true,
    RequireSignedTokens = true,
    ValidateIssuerSigningKey = true,
    IssuerSigningKey = securityKey,
};

var principal = handler.ValidateToken(idToken, validationParameters, out SecurityToken? validatedToken);
if (validatedToken is JwtSecurityToken jwtToken)
{
    var openId = jwtToken.Claims.FirstOrDefault(c => c.Type == "sub")?.Value;
    var email = jwtToken.Claims.FirstOrDefault(c => c.Type == "email")?.Value;
}
2.5 获取 Apple 公钥
Apple 的公钥通过 JWK(JSON Web Key)端点获取,建议缓存以减少请求次数。
var _keyCache = new Dictionary<string, OAuthPublicKey>();
var response = await _HttpClient.GetAsync("https://appleid.apple.com/auth/keys");
var result = await response.Content.ReadAsStringAsync() ?? "";
if (response?.IsSuccessStatusCode == true && !string.IsNullOrEmpty(result))
{
    var allValue = JsonConvert.DeserializeObject<Dictionary<string, object>>(result) ?? [];
    if (allValue.TryGetValue("keys", out object? keys) && keys != null)
    {
        var keysJson = JsonConvert.SerializeObject(keys);
        var allKeys = JsonConvert.DeserializeObject<List<OAuthPublicKey>>(keysJson) ?? [];

        foreach (var keyItem in allKeys)
        {
            if (keyItem == null) continue;
            _keyCache.SetValue(keyItem.Kid, keyItem);
        }
    }
}
return _keyCache;
缓存策略: 将公钥按 kid 缓存,验证令牌时优先从缓存匹配;若未命中则重新请求并更新缓存。
— 文档结束 —